It's 24 degrees out... 24º F...
It's officially way too cold out. It hasn't even snowed here in Carbondale, so beauty isn't even an excuse to enjoy the winter weather. However, Josh suggested something that brightens up my spirits during the cold winter months: comfort food! The recipe we have for you is what I consider to be one of the most comforting of all: Mac n' Cheese.


Add all the goodies, mix it up evenly and bake the mac n' cheese!


It's officially way too cold out. It hasn't even snowed here in Carbondale, so beauty isn't even an excuse to enjoy the winter weather. However, Josh suggested something that brightens up my spirits during the cold winter months: comfort food! The recipe we have for you is what I consider to be one of the most comforting of all: Mac n' Cheese.


What You'll Need:
-1 Chicken Breast
-2 Strips Thick Cut Bacon
-1 Cup Muenster Cheese
-1 Cup Sharp Cheddar Cheese
-2 Cups Cooked Macaroni Elbows
-1 Head of Broccoli, chopped into florets
-1/2 Cup Green Onions, chopped
-3/4 Cup Milk
-2 Tbsp Sour Cream
-3 Tbsp Flour
-1 Clove Garlic
-1/4 tsp Smoked Paprika
-1/4 tsp Coriander
-1 tsp Oregano
-Salt
-Pepper
-2 tsp Olive Oil (split)
-4 Tbsp Unsalted Butter
1. Pre-heat the oven to 350º F. Season the chicken breast: rub it in 1 tsp olive oil, salt, pepper, garlic, paprika, coriander, and oregano. Heat up the other tsp of Olive Oil over medium-high heat in a skillet. Once the oil is hot, add the chicken breast. Cook over high heat until a nice char is achieved. Cook in the oven until chicken is cooked through, about 15 minutes, and cut into bite sized pieces. Cook pasta according to package instructions and set aside.
2. Make a roux for the cheese sauce: heat butter over medium heat, add the flour, and stir frequently until it becomes white and bubbly. Add the milk and both of the cheeses. Stir everything together until a cheese sauce is formed.
3. In a casserole dish, combine the macaroni, sour cream, and cheese sauce. Then add the broccoli, and 1/4 Cup of green onions. Mix all the ingredients evenly throughout the casserole dish. Grate some cheddar cheese to top off the mac and cheese. Bake in the oven for 15-20 minutes. Top with left over green onions, and enjoy!

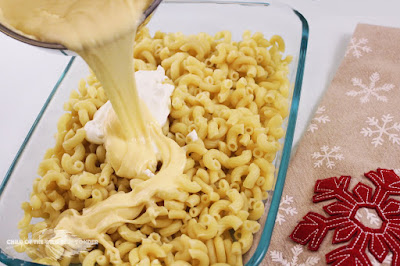
Add sour cream, and the cheese
sauce to the macaroni. Mix until
the noodles are completely coated.


Add all the goodies, mix it up evenly and bake the mac n' cheese!


After baking, the mac n' cheese is ready to serve!


